
How to Hem Jeans Like a Pro: Step-by-Step DIY Guide
Most jeans are not made for your exact height. They are made for an average inseam, which means a huge number of people are walking around in jeans that are too long, dragging on the ground, or bunching at the ankle. The good news is that hemming jeans is one of the easiest and most satisfying alterations you can learn at home.
In this guide, we go beyond the basic rolled hem and walk you through the professional method: cutting the jeans to the right length, then reattaching the original factory hem so the finished result is completely seamless. No one will ever know they were altered.
We cover every step from measuring and marking to the final topstitch, with photos to guide you along the way. We also explain when it makes more sense to hand the job to a professional tailor, so you can make the right call for your jeans and your time.
What You Will Need
The supplies for this project are simple and inexpensive. Most of them are probably already in your home:
Optional: A serger or overcast stitch setting on your machine will give you a cleaner raw edge finish, but a standard zigzag stitch works perfectly well and is what most home sewers use.
Step-by-Step: How to Hem Jeans and Keep the Original Hem
This is the method professional tailors use. Instead of simply folding and stitching the raw edge, we cut the excess fabric away, preserve the original factory hem, and sew it back on. The result looks like it came straight off the production line.

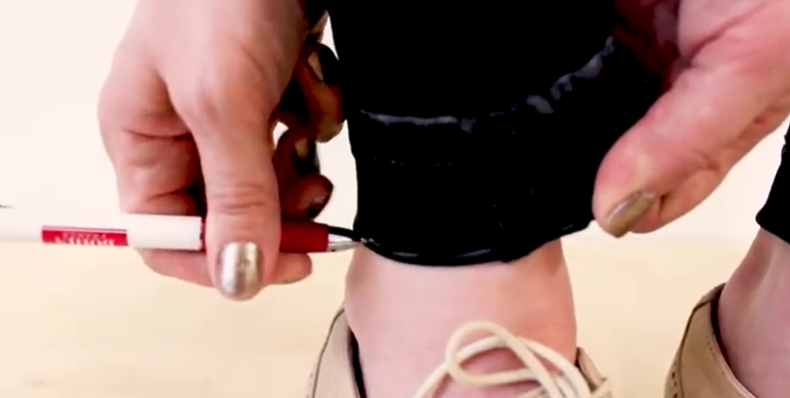
Put on your jeans and roll them up to exactly where you want the final hem to fall. Using your chalk pen, mark the very bottom of the fabric all the way around the leg. Mark as far around as you can comfortably reach while wearing them. Front and back marks are all you need to establish a straight line.
Lay the jeans flat on your cutting table. Place a ruler across the leg and connect all your tick marks into one clean, continuous line. This becomes your cutting line, so take your time and make sure it sits straight across the fabric.


Cut straight along the chalk line using sharp scissors. You will now have a shorter pant leg and a cut-off piece of denim. Do not discard this piece. It carries the original factory hem and you will be reattaching it in a later step. Set it safely to the side.
Lay your cut-off piece flat on top of the second pant leg, lining up the edges carefully. Trace along the edge of the cut piece with chalk to mark an identical cutting line on the second leg. Cut along that line. You now have two shortened legs and two hem pieces ready to work with.


Turn each hem piece inside out and use your seam ripper to carefully remove the original hem stitching all the way around. A helpful trick is to push the pointy end of the ripper in slightly, then rotate it so the red safety ball sits on the inside. This lets you push forward smoothly rather than digging in. Take it slowly when you reach the side seams, as the denim layers are at their thickest there.

Unroll the opened hem and lay it flat. Place your ruler on the raw edge and measure up exactly 1 inch, then draw a chalk line across the full width of the piece. Cut along this line. You will be left with 1 inch of fabric attached to the original half-inch rolled hem, which is precisely the seam allowance needed to reattach it neatly. Repeat on both pieces.


Set your sewing machine to a zigzag stitch and sew along the raw edge of each hem piece to seal it. If you have a serger or an overcast stitch, either of those works just as well. The goal is simply to stop the fabric from fraying with wear and washing. Backstitch at both ends, then do the same on the second piece before moving on.

With the pant leg turned right-side out and the hem piece turned wrong-side out, slide the raw edge of the pant leg all the way down into the bottom crease of the hem piece. Lap it over and pin generously all the way around. As you pin, you will start to see the original hem fold back into place exactly as it was, giving you that clean factory look on the outside.


Switch your machine back to a straight stitch. Sew directly over the original stitch holes so your new topstitch sits right in line with the old one. This is what makes the alteration invisible from the outside. Remove pins as you reach them, backstitch at the start and end, and then repeat the entire process on the second leg.

When to Skip the DIY and Visit a Professional Tailor
This guide works well for most standard denim, but there are situations where taking your jeans to a professional tailor is simply the better choice. Here are the most common ones:
Frequently Asked Questions
Iron-on hem tape is a no-sew option, but it does not hold up well through repeated washing and will not give you the clean finish of a sewn hem. For a result that lasts, a sewing machine or a professional tailor is the better choice.
Most jeans use a contrasting thread for the topstitch, typically orange, tan, or gold rather than a matching blue. Take your jeans to a fabric store and hold different thread colors against the existing hem stitching to find the closest match before you start.
Most tailors complete a basic hem within 24 to 72 hours. Jobs that involve preserving the original hem or working with specialty denim may take 3 to 5 business days. Many tailors also offer same-day or rush service.
A basic hem folds the raw edge over and stitches it down. It is quick but creates a noticeably different look at the bottom of the jean. Preserving the original hem involves removing the factory hem, trimming the excess length, and reattaching it so the final result is virtually indistinguishable from the original.
Look for tailors who list denim alterations as a specific service rather than a general offering. Reading customer reviews is important, paying attention to comments about stitch quality, turnaround time, and communication. Our directory at TailorsAndAlterations.com lists verified alteration professionals by location and specialty across all 50 states, making it easy to find someone nearby.
Image Credits: All step-by-step photographs are sourced from the video “How do you hem Jeans?” by Sew Anastasia (Anastasia Chatzka), published March 15, 2019. The tutorial demonstrates DIY jean hemming while preserving the original hem, filmed on a Husqvarna Viking sewing machine. Watch the original video on YouTube: youtube.com/@SewAnastasia.
ExoWatts
July 12, 2026Great content! Keep up the good work!